Upcycling: Transforming a tea box into doll furniture
Wow! I can't believe the summer is over! I feel like I was doing my final exams last week and all of a sudden I was back in college. I'm very happy to be able to write a few posts a month, but as usual I don't have time to edit or write all the posts I can think of. Being too busy renovating homes, I try to focus on simple projects and contributions, because I know that if I take on a complex project it will end up being neglected. I’m not going to do a craft post, but since this is a change, I don’t think I’m going to waste time creating a craft from scratch.

How did this idea come to me? Well, I can't get full credit. Quick Fact: A few weeks ago I came across a post on the Boneque Instagram page, which found some cheap wooden items and turned them into stunning furniture. This is the original message from IG. I really encourage you to follow me on Instagram, her photos are amazing and I love them. After looking at the photo, I got to know what he was doing, but he more or less explained the process on his blog. You can read it here, but it's in Spanish. Moreover, it is not very “deep” with the process. I will try to explain everything step by step, I would like to explain something more clearly than to ask how I did it. So let’s get started!
I found these two boxes of pine and spruce. It was created to store tea and other beverages. The big one says “Infusion” on one side. I’m only going to change the little ones today because I still don’t know what to do with the big ones.

You will also need other items:

I would say that the craft is quite easy for adults. I don't think any of my readers are under the age of 25, but since this is the Internet and you're a kid stuck on this site, ask an adult to help. Also, sorry for the hand. I had severe eczema for a while. It’s better now, but some of the fingers have cracked a bit.
I started by removing the screws from the brackets and hinges. If you don’t have a fairly thin screwdriver, you can remove it by applying pressure with a flat-head screwdriver. If you try to be careful, you can damage the box. If you want some kind of glass cabinet, remove the connectors.

So far we have. The cover can be used for future crafts if I want to make a glass table.

When finished, cover the hole with putty. My holes are so small that I could cover them with a thick first layer. Let the putty dry for at least an hour.

Leave the sand to soften with lumps or lumps.

He decided to paint it dark gray. You may have seen me before with this brand. The Spanish manufacturer Titan makes an artisanal dye called Aculux in two finishes: matte and satin. It seems to me that the mat formula is of higher quality and has a higher coverage. Unfortunately, they do not transmit all the colors in their matte formula.

I decided to do a little test on the back of the furniture to see if I needed a primer or if I could skip it. The wood is very porous, so you definitely need a primer.

I chose gesso as a raw material. It often works well on porous surfaces such as cardboard or canvas. Primera is pretty cheap and there are ways to make it cheaper for me, but I already have it at home.

It’s hard to paint between the shelves, but we can do it. The shelves are stuck and I couldn’t remove them to paint faster.

Allow the printer to dry properly. Gesso takes 24 hours to dry completely, but it may take less time if you use a different primer. Also, I would recommend gently spraying the print after drying, as some printers (especially multilayer raw materials) have a rough surface. In addition, the print can crystallize if left to dry for a long time.
That’s when I started painting the back and sides. A little tip: the color follows the lines of the tree, it looks better. Of course, when you start painting the shelves, things get a little complicated.

Then paint the interior

Give enough layers. You can paint your legs between layers. I chose to paint in the same color, but you can paint in a different color if you want. I prefer to paint first and then assemble. This is just a personal preference, you can paste the pieces first and then paint them if you want. It’s easier for me, especially if you draw with a different color. You can always touch it after the glue has dried.

Now is the time to put everything in its place. If you can’t find anything that fits your legs, you can always cut the bottom popcorn with a stick (as Bonequea did in one of the sections) or cut a thick wooden stick to make your legs. Of course, you can do this and skip this step.

It can be seen here.

Well, that's hard: you have to let it dry for a few days. I recommend letting it dry for a week or so before putting the items on the shelves, which can leave marks and paint. I also recommend letting it dry a bit if a child is playing with it. In this case, applying a top coat or spray can also be good. When it is completely dry, your doll can taste it.

This job doesn't take much time. I’ve needed a little more because I’ve been very busy lately, but if I pay attention, it will take a few days (note the time to dry the paint and glue). I would also say that the project is quite cheap. I already have everything I need except squares, buckets, and wood fillings (you can skip them).

If you can’t find a box that splits from the inside, you can always get a regular box and make a plywood shelf. This will take a little longer, but will allow you to paint the back of the shelf a different color.

I quickly built a diorama using cardboard, wallpaper and sofa that came with the IKEA Huset group.

Since some of you like my back photos, here’s how to fix everything.

We hope you enjoyed this post and that it has given you some ideas for your dollhouse. If you are working on your version, please let me know by leaving a comment on all posts. Or post on Instagram or other social media. I want to see your creation.
University starts in a few days and I don’t know if I’ll find time to post during the course, so in a few months this may be my last post. I'll try to write another post, but I don't promise anything. The school year always starts well, but at the end of October my life becomes a train wreck.

Also, I don’t know if you’ll notice any changes in my lighting, but Master Monster surprised me with a ring-light a few weeks ago. I had no intention of taking it until it moved, but it found and surprised me a lot. I’m still figuring out how to set it up to work for me, but we’ll get to that in the end.
I wish you the best and a wonderful fall / fall. Be careful!
ANDEREA
Social networks:
Facebook Twitter Instagram Tumblr

How did this idea come to me? Well, I can't get full credit. Quick Fact: A few weeks ago I came across a post on the Boneque Instagram page, which found some cheap wooden items and turned them into stunning furniture. This is the original message from IG. I really encourage you to follow me on Instagram, her photos are amazing and I love them. After looking at the photo, I got to know what he was doing, but he more or less explained the process on his blog. You can read it here, but it's in Spanish. Moreover, it is not very “deep” with the process. I will try to explain everything step by step, I would like to explain something more clearly than to ask how I did it. So let’s get started!
I found these two boxes of pine and spruce. It was created to store tea and other beverages. The big one says “Infusion” on one side. I’m only going to change the little ones today because I still don’t know what to do with the big ones.

You will also need other items:
- Wood putty or universal putty.
- Screw release screwdriver.
- Handmade paint, acrylic paint or chalk paint. You can also use colors.
- brush or roller.
- Sandpaper or a block of sandpaper to sand putty.
- Wooden primer or multilayer primer. This can be optional depending on the wood or color you choose.
- white glue (optional)
- Make small wooden beads or cubes (optional for shelf legs).

I would say that the craft is quite easy for adults. I don't think any of my readers are under the age of 25, but since this is the Internet and you're a kid stuck on this site, ask an adult to help. Also, sorry for the hand. I had severe eczema for a while. It’s better now, but some of the fingers have cracked a bit.
I started by removing the screws from the brackets and hinges. If you don’t have a fairly thin screwdriver, you can remove it by applying pressure with a flat-head screwdriver. If you try to be careful, you can damage the box. If you want some kind of glass cabinet, remove the connectors.

So far we have. The cover can be used for future crafts if I want to make a glass table.

When finished, cover the hole with putty. My holes are so small that I could cover them with a thick first layer. Let the putty dry for at least an hour.
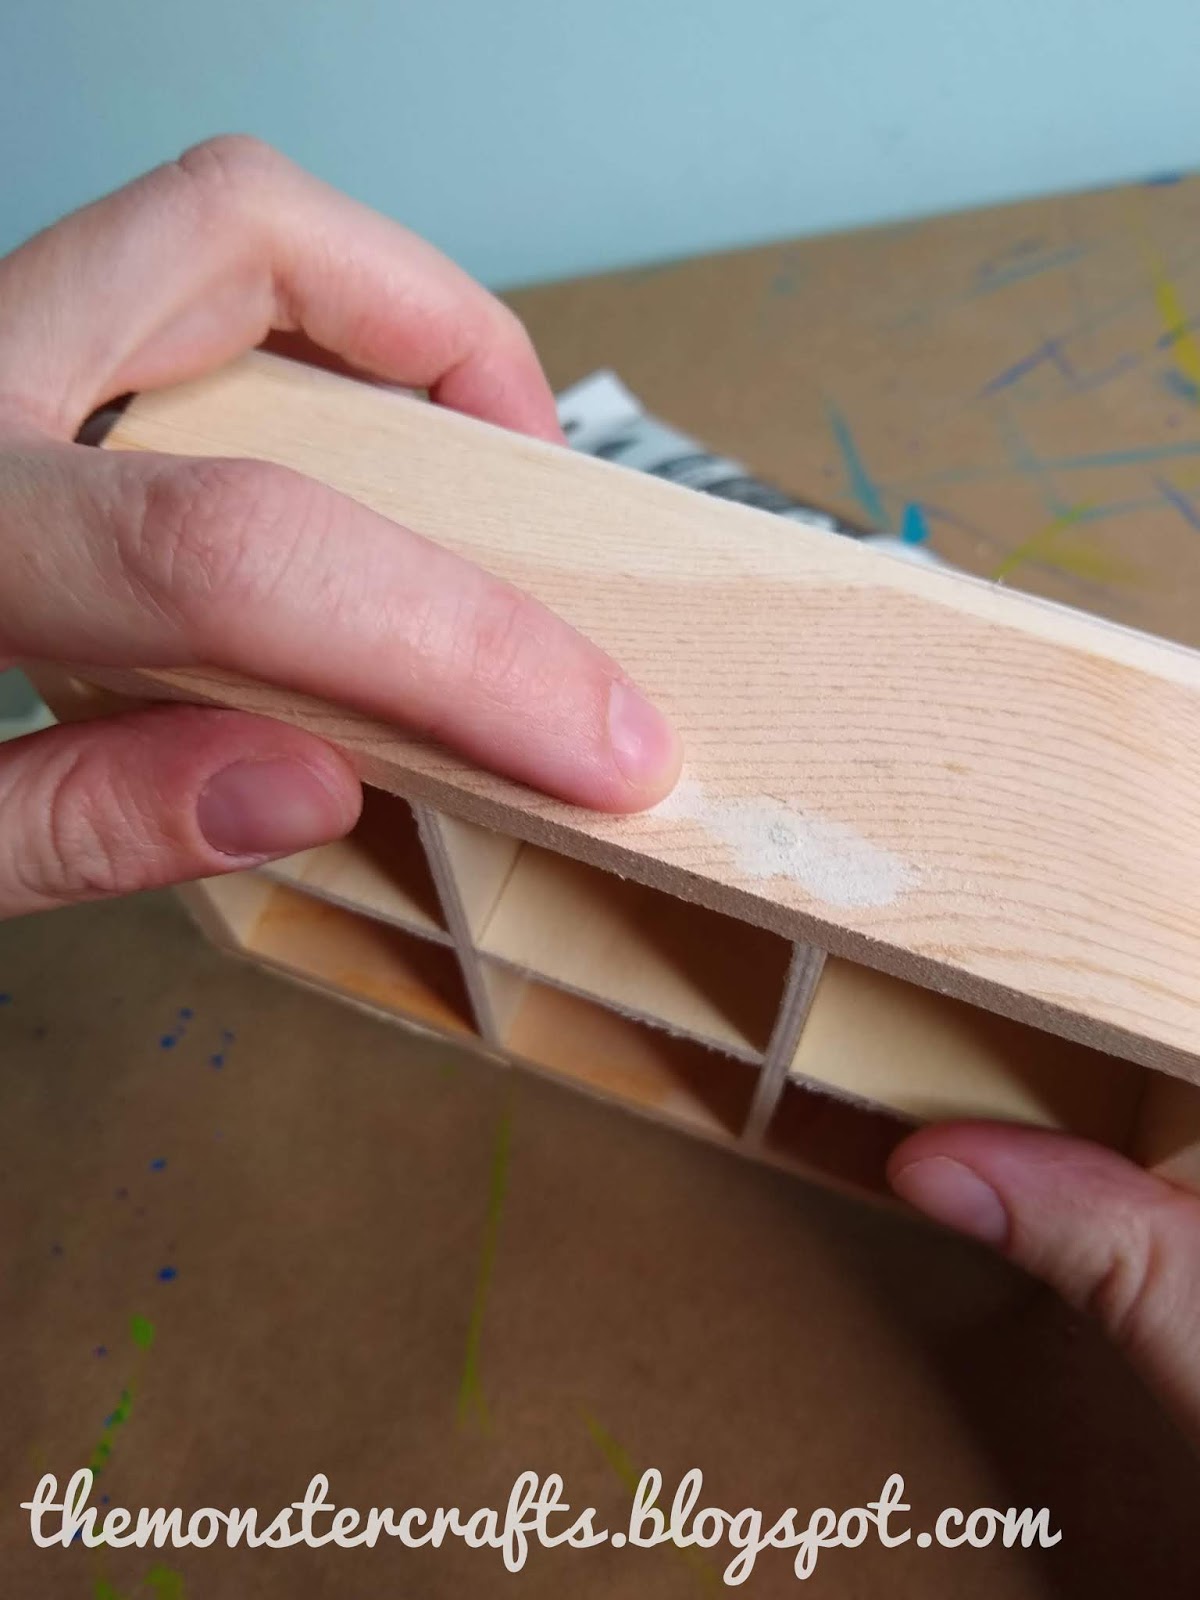
Leave the sand to soften with lumps or lumps.

He decided to paint it dark gray. You may have seen me before with this brand. The Spanish manufacturer Titan makes an artisanal dye called Aculux in two finishes: matte and satin. It seems to me that the mat formula is of higher quality and has a higher coverage. Unfortunately, they do not transmit all the colors in their matte formula.

I decided to do a little test on the back of the furniture to see if I needed a primer or if I could skip it. The wood is very porous, so you definitely need a primer.

I chose gesso as a raw material. It often works well on porous surfaces such as cardboard or canvas. Primera is pretty cheap and there are ways to make it cheaper for me, but I already have it at home.

It’s hard to paint between the shelves, but we can do it. The shelves are stuck and I couldn’t remove them to paint faster.

Allow the printer to dry properly. Gesso takes 24 hours to dry completely, but it may take less time if you use a different primer. Also, I would recommend gently spraying the print after drying, as some printers (especially multilayer raw materials) have a rough surface. In addition, the print can crystallize if left to dry for a long time.
That’s when I started painting the back and sides. A little tip: the color follows the lines of the tree, it looks better. Of course, when you start painting the shelves, things get a little complicated.

Then paint the interior

Give enough layers. You can paint your legs between layers. I chose to paint in the same color, but you can paint in a different color if you want. I prefer to paint first and then assemble. This is just a personal preference, you can paste the pieces first and then paint them if you want. It’s easier for me, especially if you draw with a different color. You can always touch it after the glue has dried.

Now is the time to put everything in its place. If you can’t find anything that fits your legs, you can always cut the bottom popcorn with a stick (as Bonequea did in one of the sections) or cut a thick wooden stick to make your legs. Of course, you can do this and skip this step.

It can be seen here.

Well, that's hard: you have to let it dry for a few days. I recommend letting it dry for a week or so before putting the items on the shelves, which can leave marks and paint. I also recommend letting it dry a bit if a child is playing with it. In this case, applying a top coat or spray can also be good. When it is completely dry, your doll can taste it.

This job doesn't take much time. I’ve needed a little more because I’ve been very busy lately, but if I pay attention, it will take a few days (note the time to dry the paint and glue). I would also say that the project is quite cheap. I already have everything I need except squares, buckets, and wood fillings (you can skip them).

If you can’t find a box that splits from the inside, you can always get a regular box and make a plywood shelf. This will take a little longer, but will allow you to paint the back of the shelf a different color.

I quickly built a diorama using cardboard, wallpaper and sofa that came with the IKEA Huset group.

Since some of you like my back photos, here’s how to fix everything.

We hope you enjoyed this post and that it has given you some ideas for your dollhouse. If you are working on your version, please let me know by leaving a comment on all posts. Or post on Instagram or other social media. I want to see your creation.
University starts in a few days and I don’t know if I’ll find time to post during the course, so in a few months this may be my last post. I'll try to write another post, but I don't promise anything. The school year always starts well, but at the end of October my life becomes a train wreck.

Also, I don’t know if you’ll notice any changes in my lighting, but Master Monster surprised me with a ring-light a few weeks ago. I had no intention of taking it until it moved, but it found and surprised me a lot. I’m still figuring out how to set it up to work for me, but we’ll get to that in the end.
I wish you the best and a wonderful fall / fall. Be careful!
ANDEREA
Social networks:
Facebook Twitter Instagram Tumblr


