Making colorful crates
I've been in such a bad mood lately, I've been involved in various craft projects. On the one hand I worked on my Mix'n'Match fund part 2, on the other hand I worked on decoration and photo equipment. But the sudden heat wave interrupted my work, because not only was there an air conditioner in my doll's room, there was also a problem in our living room (next to the doll). space, և I connect two spaces for cooling). While waiting for things to get back to normal, I thought it would be a good idea to start working on this post.


You can use them as pillars to sit or fold your dolls, or to keep them as background color.


 You can of course use them with any background image you like. You can choose accessories to match or contrast with your background or even your doll's outfit. I find it easier to associate your poster with a Monster High doll than a Barbie doll because each doll had its own color scheme and was usually quite bright. In this photo of Howlin I chose a blue background: yellow և orange box to match her hair: accessories.


When I first started working on my posters I thought it would be fun to create a colored or moving background to contrast with the background. I thought of things for dolls to sit with or bend over to take pictures, the two things that came to mind were chairs and boxes. I would like to make chairs later, but since it would take a long time to create a project, I chose the box. A few years ago, in a post titled How to Make a Luxury Doll Box , I created a couple of boxes where I'm going to walk through the entire process. As I don't want the two posts to be the same I won't go into specific explanations of the process but will focus on the mistakes I made, the mistakes I made so you can learn from them. .
All you need for this craft are some sticks, scissors, glue and handmade paints. Build at your own risk.
Let's start with the first thing I changed - the tools. In the original post I cut all the parts with scissors and after a while my hand started to hurt. This time, however, I took these pruning shears: much easier to work with. It was cheap too, these were cut like a dream so if you can I recommend buying a pair.

I made the boxes almost exactly like the original versions. I lined up 5 sticks and marked 8 cm (3.15 inches). I was thinking of using 6 sticks instead of 5 but when I put them on they didn't look good. I like to keep my pieces on the table by the tape measure.

I have the first two like my original post. First I glued some sticks to the bottom of the box.

Then I measured the narrow part of the base and cut 4 parts from that direction. You should be able to remove 2 pieces from each stick. Then cut into 2 parts and glue around the edges. You need to complete 3 such pieces.

Glue small pieces on the side, vertical pieces on the outside. I use canned food to keep it until the pieces are dry.

Now we glue the parts together. Don't forget the middle part at the beginning և below: at the end.

I started making two boxes to see how they looked and then made more. First I decided to draw with the same fuchsia I used in a recent post.

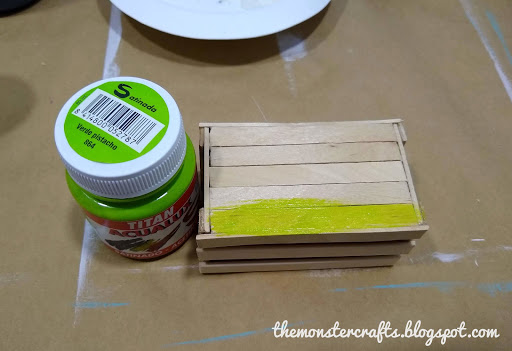
The second time I chose the same brand of green pesto because I wanted the color to be lighter. Unfortunately, this can be circumvented - unless you're a tech who knows what you're doing. I know that light colors don't usually cover completely, but they are mostly transparent.

I mixed the greens up a bit to finish off the first layer, which helped a bit. Then I went with a couple of coats of green. I don't know if I would give 3 or 4. It still sounds modest when you look closely, but from a distance it's good.

I decided to try something different in 3-4 boxes. In the body, I glue the pieces that go through the edges so there is more room to glue the sides together.

The second thing I changed this time was to paint the pieces before gluing them. This is something I do in other crafts - I wanted to see if it would be easy to draw in this craft. I chose an orange for the first box.

I chose yellow for the fourth box. Not wanting to go through the same ordeal as the green box, I mixed the first coat of yellow with some white to hide the wood lines. Then I wore a yellow coat.

When everything is drawn, it's time to put everything in place. Although some spots are a little easier to paint this way, it slows down the process by allowing you to wait for the paint to dry before wrapping it. It's a strategy that works in other jobs, but not in this job. Here are the last 4 boxes.

Now it's time to use it in doll photos. For a while I had this idea of very bright or neon colored wallpaper. I have an idea for a colorful striped background that I may create in the future. Here is just a picture of it (BMR1959).


It is very difficult to photograph in the background. I checked the phone settings a bit and was able to get a more decent picture of Kim. I think if I want to keep working behind the scenes I should take the time to learn some photography basics.

The doll is leaning against the yellow box on the wall. Here's something behind the scenes. Sorry it's a bit vague, but you have an idea.

Of course, you shouldn't use them on a black background. Here I used white cardboard for the walls, and in the previous post I made them for the white floor. They're not the same shades of white, but I don't think it's that noticeable.


This craft was so much fun, I love the results. Making them isn't that difficult: it really adds something to the photo. I really encourage you to try and take photos of your dolls. You don't have to make it look like me, there are so many colors, those possibilities are endless. For example, boxes can be painted black and used on a white background, which can be very interesting.

I hope you enjoy this post. I would definitely love to make more doll accessories or dioramas like chairs or shelves, but I can't stop thinking about making more backgrounds. I have to try to combine the pillars and the backstory to make everything more balanced. Right now I have a lot of thoughts in my head that I'm working on several things at the same time, which means they won't end fast enough. when will this happen to you
As always, if you have ideas for future posts, let me know what you think in the comments section. I know some of you mentioned doll photography tips or backstage messages, և I definitely want to do that, I need to think about what to write.
I hope you have a wonderful day.
monster craft.
Check out the Doll Crafts tab for other fun craft projects.


