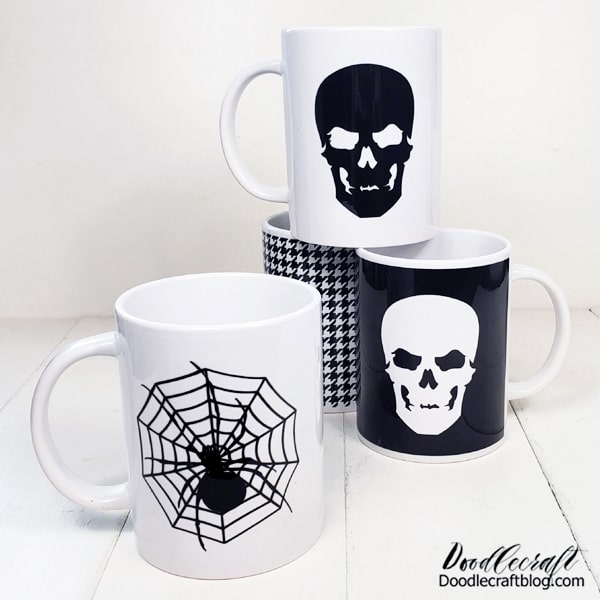
Halloween Mugs with the Cricut Mug Press


One month until Halloween! I love the change of seasons... the connection between the heat of summer, the cool breeze and the fall of autumn leaves. I love the wind in the air - it smells like Halloween! However, I also love mugs, so the Halloween mugs were the perfect addition to a hot chocolate bar. Tell us how easy it is to make cups with Cricut Infusible Ink Transfers and the Cricut Tug Press.

Halloween cup with cricket cup

One month until Halloween! I love the change of seasons... the connection between the heat of summer, the cool breeze and the fall of autumn leaves. I love the wind in the air - it smells like Halloween!

However, I also love mugs, so the Halloween mugs were the perfect addition to a hot chocolate bar. Let me show you how easy it is to make cups with Cricut Infusible Ink Transfers and the Cricut Tug Press . I purchased this product from Cricut in exchange for this post.

One month until Halloween! I love the change of seasons... the connection between the heat of summer, the cool breeze and the fall of autumn leaves. I love the wind in the air - it smells like Halloween! However, I also love mugs, so the Halloween mugs were the perfect addition to a hot chocolate bar. Tell us how easy it is to make cups with Cricut Infusible Ink Transfers and the Cricut Tug Press.

Trophies are also the perfect handmade gift! If you're thinking of handmade gifts for the holidays, this is the show! These mugs are clean and safe for the microwave!!! Bom continues to give presents.

The initial investment is Cricut Mug Press ...but it's amazing. I've been making mugs in the oven for over a year, but this tool makes everything very tasty and saves a lot of time.

or

Trophies are also the perfect handmade gift! If you're thinking of handmade gifts for the holidays, this is the show! These mugs are clean and safe for the microwave!!! Bom continues to give presents. The initial investment is Cricut Mug Press...but it's amazing. I've been making mugs in the oven for over a year, but this tool makes everything very tasty and saves a lot of time.

Necessary accessories for Halloween Cup:


Jack maker (or equivalent machine)
Driving lights

Halloween Cutting Supplies: Cricket Maker (or equivalent machine)


Step 1: Cut as much paint as possible

Start by choosing a design from the cricket design space. There is a skull and a spider in the net. I like that the skull reveals a shape that I can use in the second cup.

Design a canvas by selecting a square shape, place it on the canvas, then open the lock icon so you can change the dimensions individually. Make it 8.75 inches wide and 4 inches high.

Then add the skulls to both sides of the rectangle, cut the images together and push, ready to cut!

Reflex mirror. Place the melted paint on a firm mat and hold it in place with a bra. Touch as little as possible.

Then select the outfit and cut.

Step 1: Cut out possible painting Start by selecting a design from the Cricut Design Space. There is a skull and a spider in the net. I like that the skull reveals a shape that I can use in the second cup. Design a canvas by selecting a square shape, place it on the canvas, then open the lock icon so you can change the dimensions individually. Make it 8.75 inches wide and 4 inches high. Then add the skulls to both sides of the rectangle, cut the images together and push, ready to cut! Reflex mirror. Place the melted paint on a firm mat and hold it in place with a bra. Touch as little as possible. Then select the outfit and cut.

Step 2: Sleepy Weed Tincture

Using dry hands, carefully remove any excess melted paint from the top. Touch the transfer paint as much as possible, otherwise the paint will rub. Peel a squash, grate it and squeeze out the juice.

Gently lift the positive shape and you can use it as a second cup!

Step 2: Use dry hands with insoluble paint and gently remove the insoluble paint from behind. Touch the transfer paint as much as possible, otherwise the paint will rub. Peel a squash, grate it and squeeze out the juice. Gently lift the positive shape and you can use it as a second cup!

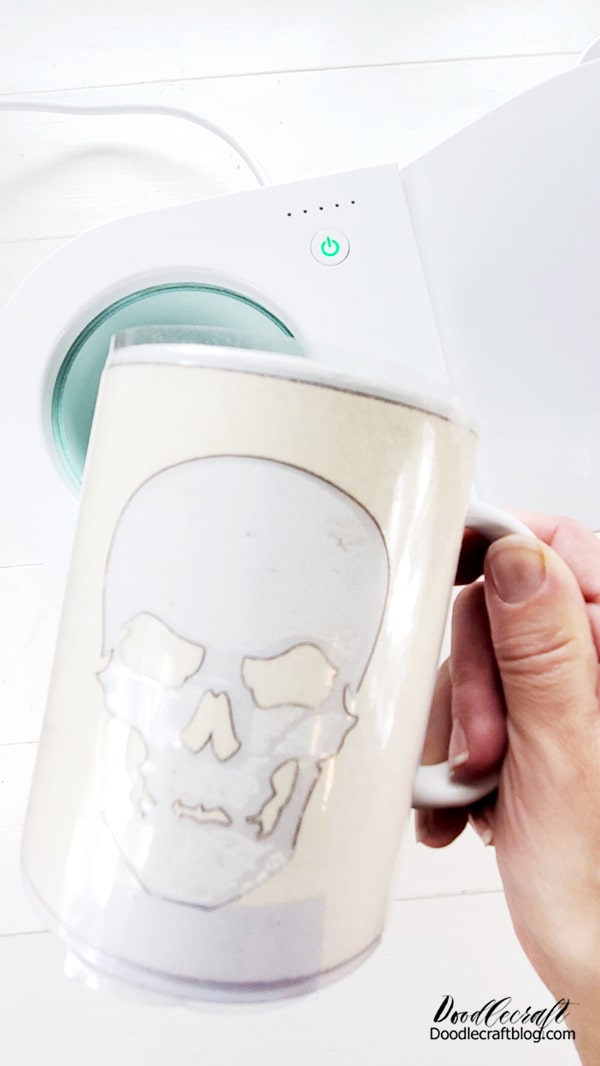
Step 3: Stick in the cup

Now use a gauze roll to remove any dust or micro cracks from the cup. Wrap the infusion tube around the mug and secure it with a heat band.

** Useful advice **
An adhesive tape holder is ideal for your heating tape!

Step 3: Stick on the cup Now use a gauze roll to remove any dust or debris from the cup. Wrap the infusion tube around the mug and secure it with a heat band. **Helpful Tip** Central wheel heating is great for your tires!

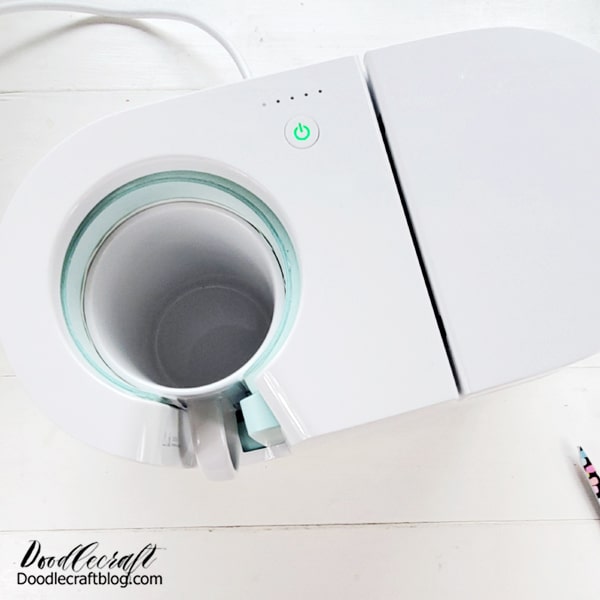
Step 4: Heat the cup

Login to Cricket Mug Press , if it's your first time, you need to login to computer and update before you start. After that, just combine it and let it warm up. The light turns green when ready to print.

Step 4: Press the tour press bar in the cricket press, this is the first time, it must be connected to the computer and updated before you start. After that, just combine it and let it warm up. The light turns green when ready to print.

Step 5: Squeeze the cup

Then lift the top lid and place the cup in the opening. Then tighten the lid and let it rest. Cutting the cup will go through 5 lights in a row above, which will take about 5 minutes. Then he will scream.

Release the cup and carefully remove it from the glove...the rest is very hot!

Step 5: Squeeze the cup, then lift the top lid and place the cup in the opening. Then tighten the lid and let it rest. Cutting the cup will go through 5 lights in a row above, which will take about 5 minutes. Then he will scream. Release the cup and carefully remove it from the glove...the rest is very hot!

Next, the hardest part---let the mug cool completely.

Once the cups have returned to room temperature, remove and transfer the heating strip. See what the magic looks like!

Next, the hardest part---let the mug cool completely. Once the cups have returned to room temperature, remove and transfer the heating strip. See what the magic looks like!

It is useful to work with other glasses while waiting for it to cool.

It is useful to work with other glasses while waiting for it to cool.

It's here! Isn't it spectacular! The non-stick paint is shiny, vibrant and full of life! It is poured into the ceramic and should not be washed, peeled or peeled.

The perfect handmade gift for teachers, neighbors, friends and family! I want to give a suitable mug as a wedding gift!

It's here! Isn't it spectacular! The non-stick paint is shiny, vibrant and full of life! It is poured into the ceramic and should not be washed, peeled or peeled. The perfect handmade gift for teachers, neighbors, friends and family! I want to give a suitable mug as a wedding gift!

The best part is that it takes time. If you decide on your figure quickly, it may take around 10 minutes or less to drop in a few drinks.

Make cups for all parties, make them for pencil holders, makeup brushes or seasonal decorations!

The best part is that it takes time. If you decide on your figure quickly, it may take around 10 minutes or less to drop in a few drinks. Make cups for all parties, make them for pencil holders, makeup brushes or seasonal decorations!

It's here! Questions? Feel free to ask maildoodlecraft@gmail.com for anything cricket related.

Like, tag and share!


One month until Halloween! I love the change of seasons... the connection between the heat of summer, the cool breeze and the fall of autumn leaves. I love the wind in the air - it smells like Halloween! However, I also love mugs, so the Halloween mugs were the perfect addition to a hot chocolate bar. Tell me how easy it is to make cups with Cricut Infusible Ink Transfers and the Cricut Tug Press.


Facebook Follow me on Pinterest  YouTube-a instagram Tweeter
Post Scriptum

Next Post Previous Post
No Comment
Add Comment
comment url