Upcycling: Transforming a tea box into doll furniture
Hey! I don't think winter is over! It seems to me that last week, when I finished my last game, I suddenly found myself back in college. I am glad that I managed to write several articles during the month, but, as usual, I did not have time to do everything or write the articles that I suggested. While I was busy renovating my house, I tried to focus on simple projects and posts; Because I know that if I start a difficult project, he will eventually leave me. I haven't done any crafting posts, but since this is an adjustment, I don't think it will take me long to make it from scratch.

How did this idea come to me? So I can't thank him enough for all this. Brief history: A few weeks ago I came across an Instagram post from Bonequea , found cheap wood furniture and turned it into the best furniture. Here is his first post on IG. I really encourage you to follow her on Instagram, her photos are amazing and I admire her. Looking at the photo I understood what she was doing, but more or less explained the process in her blog. You can see it here, but it's in Spanish. Also, you don't delve into the process. I try to explain everything step by step, because I prefer to explain something understandable, rather than asking how I did it. And let's get started!
I found these two pinewood boxes. It should be used to keep tea and other infections away. The big one says "infection" on one side. I'll just change it a bit today because I still don't know what to do with the big one.

You will also need other materials:

I say it's an easy task for an adult. I don't think my readers are under 25 but ask an adult to help you because this is the internet and you are the kid who found this site. And forgive my hands. I have had severe eczema for some time. It's better now, but some fingers are a little cracked.
I start by removing the bolts from the bracket and pivot. If you don't have enough thin-screen discs, you can remove them with a flat-blade rifle. Be careful if you try to do this, as breaking the box can be dangerous. If you want to have some kind of glass cabinet, just remove the connector.

This is what we have so far. If I want to make a glass table, the lid can be used for a future craft.

After making holes, cover them with putty. My holes are so small that I could cover them with primer. Let the putty dry for at least 1 hour.

Leave gently to remove stains or lumps.

Decided to paint it dark grey. You may have seen me use this brand. The Spanish manufacturer of acrylic paints Titan produces two types of finishes: matte and satin. I think Matty's formula is better and has more coverage. Unfortunately, they do not include all colors in their mathematical formula.

I decided to experiment a bit with the back of the cabinet to see if it needs to be cooked or thrown away. The wood is very porous, so you will definitely need a primer.

I decided to use Geshon as a primer. It usually works well on perforated floors such as cardboard or canvas. It's a very cheap primer and there are also ways to make plaster for less, but I've already found this at home.

Painting between the shelves is a bit of a pain, but we're getting there. The shelves are glued on and I can't take them off to paint quickly.

Let the primer dry properly. Geshe usually takes 24 hours to dry completely, but it may take a while if you are using a different primer. Also, some primers (especially many coats) have a rough surface, so I recommend slowly rinsing off the primer after it dries. Also, if left to dry for a very long time, the primer may crystallize.
Then I started painting the back and sides. A little trick: draw along the wooden lines, it will be better this way. Of course, once you start painting the shelves, the job gets a little more difficult.

Then draw the inside

Create as many layers as needed. You can draw the legs in between the layers. I prefer to paint in one color, but you can paint in a different color if you like. I prefer to paint first and collect later. It's just a personal choice, you can glue the parts together first and paint them if you like. I think it's easy, especially if you paint with different colors. When the glue dries, you can always touch it.

Now is the time to put everything in its place. If you don't find anything for your feet, you can always cut off the bottom of the popcorn (as you did in one of the hats) or carve thick wooden dolls to make your own feet. Of course, you can leave everything as it is and skip this step.

Here it looks.

Now for the hard part: you need to let it dry for a few days. I recommend letting it dry for about a week before putting things on the shelves, as this can make sense when painting. If the child wants to play with it, I recommend drying it a little. In this case, it may be a good idea to apply a layer or spray. After complete drying, toys can be enjoyed.

This craft was not long in coming. It took me a long time because I've been very busy these days, but it only takes a few days if you focus on it (consider the drying time of the paint and glue). I say that this is a very cheap project. I have everything I need except for the box, cube and wood filler.

If you can't find a box with such a separate interior, you can always find something in common and make plastic shelves. This will take a little longer, but will allow you to paint the back of the books in different colors.

I quickly created a diorama using cardboard, wallpaper and a sofa from the IKEA Huset collection.

Here are some of the ones that I found interesting:

I hope you enjoyed this article and it gave you ideas for your dollhouse. If you have created your own version, please let me know by leaving a comment on each article. Or send me a message on Instagram or other social networks. I would like to see your creations.
College starts in a few days and I don't know if I'll have time to post during the school year, so this might be my last post in a few months. I will try to write another article, but I do not promise anything. The school year always starts well, but at the end of October my life turns into a shipwreck.

Also, I don't know if you noticed any changes in my bulb, but a few weeks ago Mr. Monster surprised me with a ring bulb. I had no idea I bought it before moving in, but I was surprised it got a good discount. I'm still trying to figure out how to set it up to work for me, but we'll get there eventually.
I hope you are doing well and you have a big hurdle. Be careful!
MK
social media:
FacebookTwitterInstagramTumblr _ _ _

How did this idea come to me? So I can't thank him enough for all this. Brief history: A few weeks ago I came across an Instagram post from Bonequea , found cheap wood furniture and turned it into the best furniture. Here is his first post on IG. I really encourage you to follow her on Instagram, her photos are amazing and I admire her. Looking at the photo I understood what she was doing, but more or less explained the process in her blog. You can see it here, but it's in Spanish. Also, you don't delve into the process. I try to explain everything step by step, because I prefer to explain something understandable, rather than asking how I did it. And let's get started!
I found these two pinewood boxes. It should be used to keep tea and other infections away. The big one says "infection" on one side. I'll just change it a bit today because I still don't know what to do with the big one.

You will also need other materials:
- Putty for wood or putty for all purposes.
- Screwdriver for removing bolts.
- Craft paint, acrylic paint or lime paint. You can also use paint.
- Brush or roller.
- Sandpaper or hacker blocks, putty for washing.
- Wood primer or multilayer primer. This may be an option depending on the wood or color you choose.
- White glue (optional)
- Beadwork or small wooden cubes (for the legs of the shelf, optional).

I say it's an easy task for an adult. I don't think my readers are under 25 but ask an adult to help you because this is the internet and you are the kid who found this site. And forgive my hands. I have had severe eczema for some time. It's better now, but some fingers are a little cracked.
I start by removing the bolts from the bracket and pivot. If you don't have enough thin-screen discs, you can remove them with a flat-blade rifle. Be careful if you try to do this, as breaking the box can be dangerous. If you want to have some kind of glass cabinet, just remove the connector.

This is what we have so far. If I want to make a glass table, the lid can be used for a future craft.

After making holes, cover them with putty. My holes are so small that I could cover them with primer. Let the putty dry for at least 1 hour.
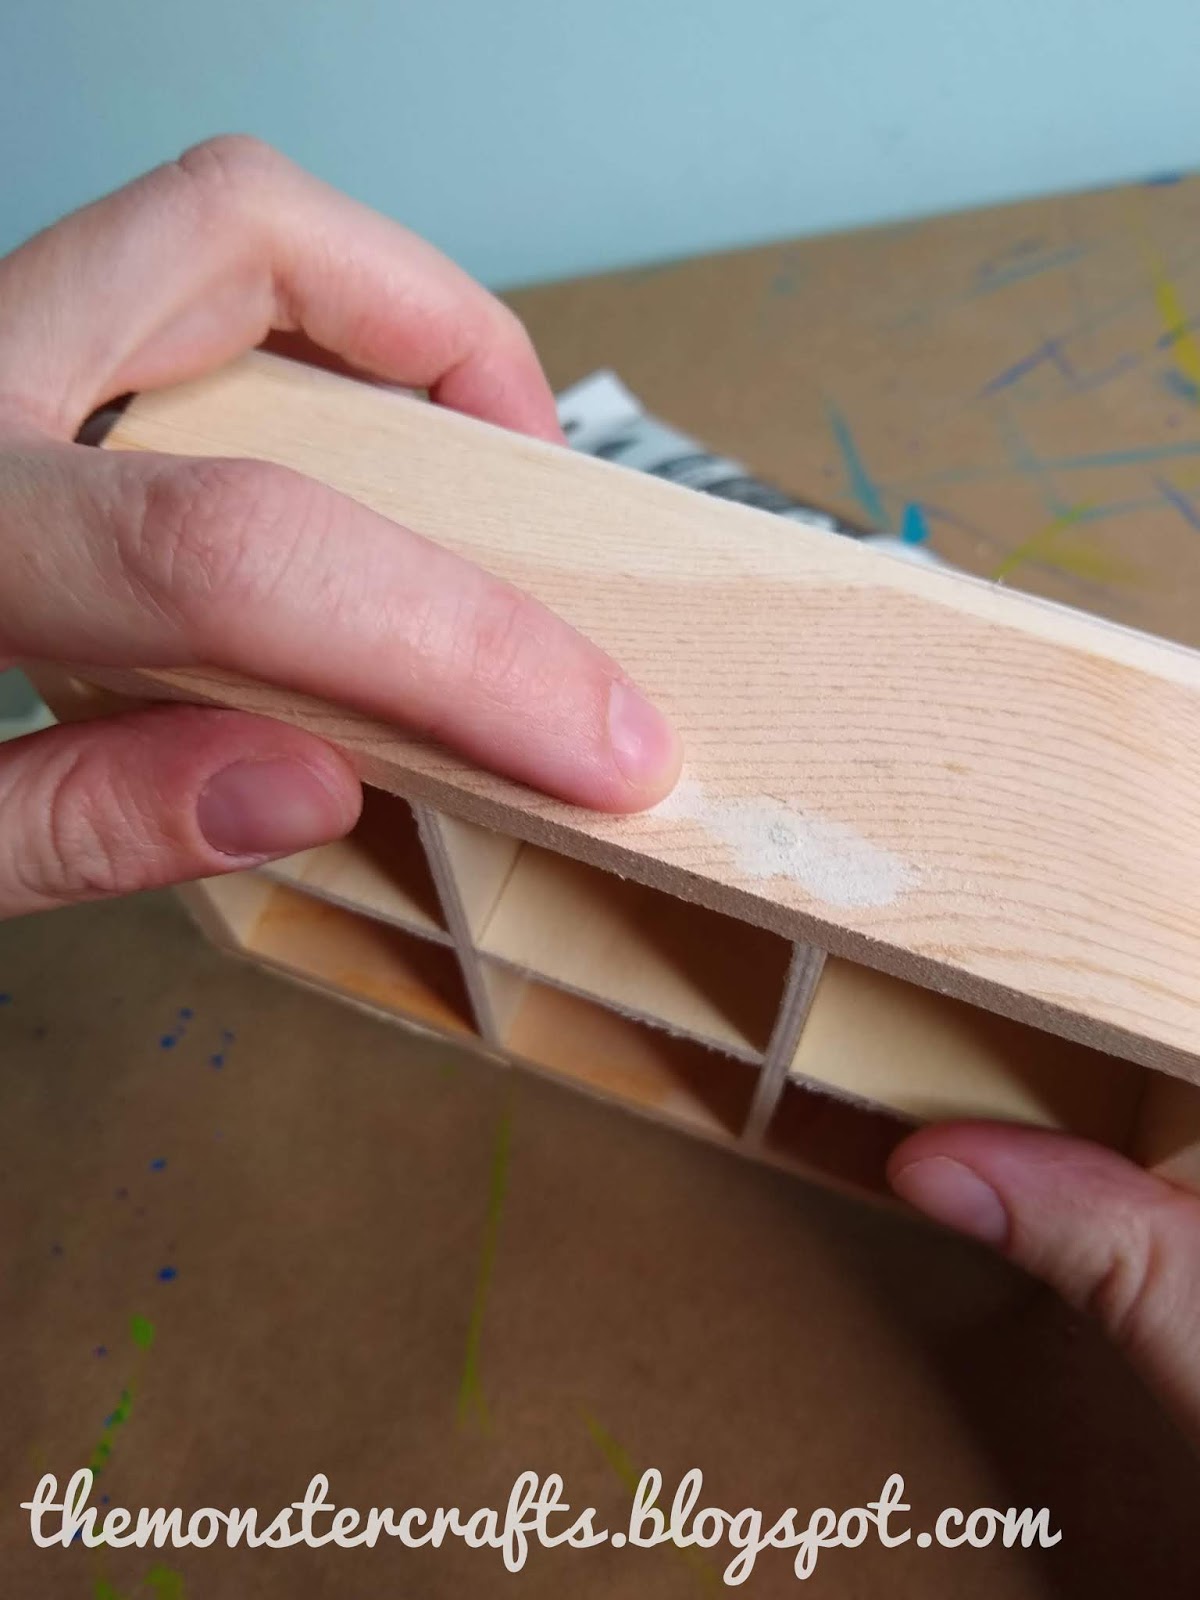
Leave gently to remove stains or lumps.

Decided to paint it dark grey. You may have seen me use this brand. The Spanish manufacturer of acrylic paints Titan produces two types of finishes: matte and satin. I think Matty's formula is better and has more coverage. Unfortunately, they do not include all colors in their mathematical formula.

I decided to experiment a bit with the back of the cabinet to see if it needs to be cooked or thrown away. The wood is very porous, so you will definitely need a primer.

I decided to use Geshon as a primer. It usually works well on perforated floors such as cardboard or canvas. It's a very cheap primer and there are also ways to make plaster for less, but I've already found this at home.

Painting between the shelves is a bit of a pain, but we're getting there. The shelves are glued on and I can't take them off to paint quickly.

Let the primer dry properly. Geshe usually takes 24 hours to dry completely, but it may take a while if you are using a different primer. Also, some primers (especially many coats) have a rough surface, so I recommend slowly rinsing off the primer after it dries. Also, if left to dry for a very long time, the primer may crystallize.
Then I started painting the back and sides. A little trick: draw along the wooden lines, it will be better this way. Of course, once you start painting the shelves, the job gets a little more difficult.

Then draw the inside

Create as many layers as needed. You can draw the legs in between the layers. I prefer to paint in one color, but you can paint in a different color if you like. I prefer to paint first and collect later. It's just a personal choice, you can glue the parts together first and paint them if you like. I think it's easy, especially if you paint with different colors. When the glue dries, you can always touch it.

Now is the time to put everything in its place. If you don't find anything for your feet, you can always cut off the bottom of the popcorn (as you did in one of the hats) or carve thick wooden dolls to make your own feet. Of course, you can leave everything as it is and skip this step.

Here it looks.

Now for the hard part: you need to let it dry for a few days. I recommend letting it dry for about a week before putting things on the shelves, as this can make sense when painting. If the child wants to play with it, I recommend drying it a little. In this case, it may be a good idea to apply a layer or spray. After complete drying, toys can be enjoyed.

This craft was not long in coming. It took me a long time because I've been very busy these days, but it only takes a few days if you focus on it (consider the drying time of the paint and glue). I say that this is a very cheap project. I have everything I need except for the box, cube and wood filler.

If you can't find a box with such a separate interior, you can always find something in common and make plastic shelves. This will take a little longer, but will allow you to paint the back of the books in different colors.

I quickly created a diorama using cardboard, wallpaper and a sofa from the IKEA Huset collection.

Here are some of the ones that I found interesting:

I hope you enjoyed this article and it gave you ideas for your dollhouse. If you have created your own version, please let me know by leaving a comment on each article. Or send me a message on Instagram or other social networks. I would like to see your creations.
College starts in a few days and I don't know if I'll have time to post during the school year, so this might be my last post in a few months. I will try to write another article, but I do not promise anything. The school year always starts well, but at the end of October my life turns into a shipwreck.

Also, I don't know if you noticed any changes in my bulb, but a few weeks ago Mr. Monster surprised me with a ring bulb. I had no idea I bought it before moving in, but I was surprised it got a good discount. I'm still trying to figure out how to set it up to work for me, but we'll get there eventually.
I hope you are doing well and you have a big hurdle. Be careful!
MK
social media:
FacebookTwitterInstagramTumblr _ _ _


