Making colorful crates
Recently I was in such a trance that I was working on a few craft projects. On the one hand, I was working on Mix'n'n'Match Background Part 2, and on the other hand, I was working on some photo decoration accessories. But all of a sudden the heat stopped my craft, because not only was there air conditioning in my doll room, but we also had difficulty staying in the living room (next to the dollhouse, I connect these two rooms. Turning to ice). So while I was waiting for things to return to normal, I thought it might be a good idea to start working on this article.


You can use these for your doll to sit or support, or just use a colored dot in the background.


 Of course, you can use them in any background. You can choose accessories that match or contrast with your wallpaper or doll clothes. I think it is easier to choose a Monster High doll background than Barbie, because each doll had its own color scheme and was often very bright. In this Hawley photo, I chose a blue background, yellow and orange box, because they match her hair and accessories.


When I started working on the wallpaper, I thought it would be fun to create colorful accessories or furniture in contrast to the background. I was wondering what dolls sit or support for photography; Two things that came to mind were chairs and drawers. I want to make some chairs in the future, but it will take some time to design and build, so I decided to go with the drawer. A few years ago, I created several boxes in an article entitled " How to Make Shebby Chick Puppet Boxes" , which I described in detail the whole process. Since I do not want to post two identical articles, I do not go into the details of this process, but I will focus on the mistakes I made, so you can learn. .
All you need for this product is sticky wood, scissors, glue - some paint. Build at your own risk.
Let's start with what I changed first. But this time I took this sewing scissors, that work is very easy. It wasn't expensive or they were just a dream come true, so I recommend you buy a pair if you can.

I made a box the same size as the first post. I made 5 cops equal to 8 cm (3.15 inches) in length. I thought I would use 6 sticks instead of 5, but it didn't work when I put it down. I like to measure them and stick my pieces on the table.

The first two were very similar to my first post. First, I glued some wood to make the bottom of the box.

Then I measured the narrow side of the foundation and cut 4 pieces on that side. You can get 2 valve pieces from each shaft. Then cut the cut into 2 parts, sticking to the edges. You will get 3 of these pieces.

Post small pieces on the side, on the outside, on the outside. I use a pot until they are dry.

Post the side sections now. Be sure to finish at the top, bottom and center.

I started making two boxes to see what they looked like, and I made more. I initially decided to paint with the same fuchsia I used in the previous post.

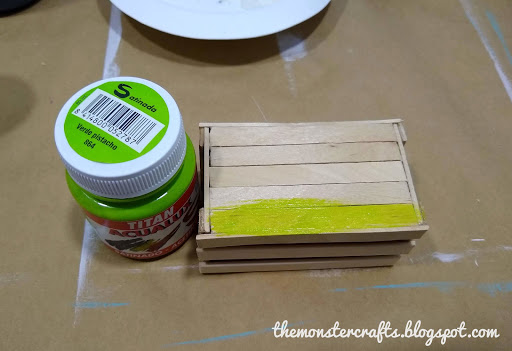
I chose the same Peso green brand for the second one, because I want the colors to be brighter. Unfortunately, I can tell from the first shot that the cover is scary. I know the bright colors are not completely covered, but they are mostly clear.

To finish the first layer, I mixed turmeric with green, which helped a bit. Then I used a few layers of green. 3 and 4 I do not remember when to pay. It may not seem obvious at first glance, but it does seem strange from a distance.

I decided to try something different in a 3 և 4 box. I basically glued the spinning pieces together, so I had more space to glue the sides together.

The second thing I changed this time was to paint the pieces before you glue them. I do this in other crafts I wanted to see how easy it is to draw in this craft. I chose oranges for the first package.

I chose yellow for the fourth box. Since I do not want to deal with the same pain as the green box, mix the yellow with a little white to help hide the wooden lines for the first coat. Then I got up wearing a yellow dress.

Once everything is painted, now is the time to put everything in place. Although it is a little easier to paint in some places, slow down the process, because you have to wait for the paint to dry before packing the box. It is a strategy that works in other businesses, but not in it. The last 4 boxes are here.

Now is the time to start using them in photo booths. For a while I had the idea of a wallpaper with really bright or neon accents. I have an idea for brightly colored wallpaper, which I hope I can create in the future. Here is a picture of a thousand (BMR1959).


It is very difficult to take pictures in the background. I checked the phone settings a little bit, I was able to take a more accurate picture of Kim. I think if I want to continue working in the background, I must take some time to learn some basic photography techniques.

The doll was lying on a yellow box, standing on the wall. There is something behind the curtain. Sorry, it 's a bit vague, but you got the idea.

Of course, you do not need to use them in the background. Here I used white paper for the walls white floor, which I did in the last post. They don't have the same white shade, but I don't think it's very visible.


This work was so fun, I loved the result. These are not very difficult to make, they really add something sharp to the photo I really recommend you try this design to draw some pictures for your doll. No need to imitate them, lots of color and endless opportunities. For example, you can paint the boxes in black and use them on a white background, it would be nice to see.

Hope you enjoyed this post. I want to create more doll or diamond photo accessories, such as chairs or shelves, but I will not go beyond thinking about creating more backgrounds. I have to try to combine creation with background creation to make everything more balanced. It seems like I'm doing a lot of things at once and I have a lot of ideas in my head, which means they don't end up as fast as they should. Does it happen to you?
Always let me know what you think in the comments section and if you have any ideas for future posts. I know some of you have suggested how to hold a doll or message behind a curtain, I have to do it, I have to think about what I want to write exactly.
Hope you have a good day.
Monster Crafts.
Check out the Puppet tab for more fun craft projects.


