Floral Painted Easter Eggs Dyed with Tombow Markers

Blooming Easter Eggs!
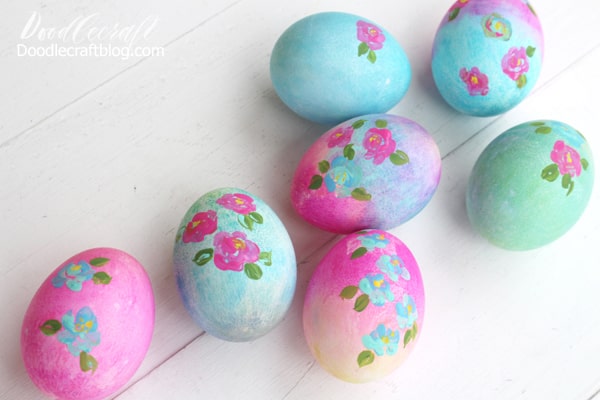
Painting eggs was not my favorite art. As a kid, I loved to lay eggs or die...but now I'm tied down! Just a simple project: beat the eggs with a marker, then add some paint to create loose flowers.

These will also look great on the Easter breakfast table...perfect shades of bright and pastel colours.
Step 1: cook the eggs
Cook eggs according to Hamilton Beach Egg Cooker instructions. It only takes 18 minutes for a perfectly cooked egg. There is no change in the brown/blue color around the yolks, perfection every time!

Flower Easter egg accessories:
Step 2: Color the hard-boiled eggs

Start painting directly with markers on a plastic bag.

It will be weak, but don't worry.

Then evaporate the plastic bag using a spray bottle.

Place the egg in the center of the bag.

Wrap the bag around the egg and watch the colors mix and mingle.

I opened the bag and saw the brightness of the color!

Use a towel to gently remove excess paint.

Repeat with all shades and colors. Allow to dry completely.

Step 3: Draw flowers on the eggs
Now get some acrylic paint and a small round brush.

Don't be afraid of these flowers...they last a few seconds and are very messy!

Hold the egg in a non-main hand.

Use a small brush to add globes to a circle.

Then add a U-shaped globe in the center.

Again, add more globe shapes around the petals.

Add a few small yellow dots in the center.

Add more leaves and flowers!

Watch this video about empty flowers - it will help you feel safe.
That's all!
These aubergines are simple because I wanted to show them some markers with small gaps... more watercolors.

Like and promote!


